Introduction
Welcome to the ArchiCode Command Line Tool Documentation. ArchiCode is a powerful tool designed to assist architects in creating models and generating views using an efficient as-code approach. Drawing inspiration from both the C4 Model and the ArchiMate Standard, ArchiCode provides a data model and a command line interface to streamline your architectural workflow.
With ArchiCode, architects can easily design models and produce views while adhering to the principles of the C4 Model. Our built-in viewpoints handle various levels of abstraction, ensuring your architectural vision is accurately represented in your projects.
Incorporating concepts from the ArchiMate Standard, ArchiCode’s model is rooted in the structural Aspect and spans the Application and Technology layers. This integration adds depth and clarity to your architectural creations.
This documentation will guide you through the features, domain, commands, and best practices for utilizing ArchiCode in your architectural projects. Let’s explore how ArchiCode can elevate your architecture-as-code journey.
Availability, License, and Deliverables
ArchiCode is an open-source software hosted on GitHub, fostering transparency and collaboration. It operates under the MIT license, granting users flexibility in its use and modification. The software is distributed as a Maven Artifact and an OCI Image (Docker Image), simplifying integration.
-
Source Code: ArchiCode’s source code is hosted on GitHub at https://github.com/tmorin/archicode, providing access for developers to explore, contribute, and collaborate.
-
Licensing: ArchiCode is licensed under the permissive MIT license, enabling users to freely utilize, modify, and distribute the software.
-
Deliverables: ArchiCode is conveniently available as a Maven Artifact and an OCI Image, facilitating easy integration into development workflows.
-
Access to Deliverables: The practical deliverables can be accessed through the dedicated packages repository at https://github.com/tmorin/archicode/packages.
This accessibility, licensing, and practical distribution emphasize ArchiCode’s commitment to fostering an open and collaborative architectural community.
Features
ArchiCode provides a structured data model that empowers architects to design and define the intricate composition of application components.
Seamlessly define the structure of technology nodes within your architecture to ensure your technology strategies are accurately captured.
ArchiCode adapts to your preferences by supporting multiple source formats, including YAML, TOML, and JSON.
ArchiCode simplifies the management of complex architectures by embracing a Kubernetes-like manifest approach to organize your source code more efficiently.
Leverage pre-defined viewpoints to automatically generate views that communicate your architectural concepts effectively.
ArchiCode’s viewpoints smartly manage relationships, providing a clear representation of how components interact within your architecture.
Integrate ArchiCode seamlessly into your CI/CD pipelines to ensure architectural integrity throughout your development lifecycle.
Customize and extend ArchiCode’s functionality by plugging in renderer engines to tailor the tool to match your unique requirements.
ArchiCode’s extensibility goes further by integrating viewpoint providers to enhance your architectural perspectives with specialized viewpoints.
The facet feature in Archicode elegantly simplifies complex architectural views, offering tailored visualizations focused on specific model elements and relationships for enhanced clarity and comprehension.
This next parts will comprehensively guide you through ArchiCode’s features, commands, and best practices, enabling you to harness the full potential of this tool in your architectural endeavors. Let’s delve into the details and unlock the benefits ArchiCode has to offer.
Domain
The ArchiCode domain serves as the foundational framework for your architectural endeavors, encompassing essential elements that facilitate and enhance your architectural work:
-
Workspace: ArchiCode’s workspace provides the supportive backdrop for all your architecture projects, offering an organized and collaborative environment.
-
Application Layer: Within the ArchiCode domain, the Application layer hosts a rich array of elements coming from the C4 Model, enabling you to meticulously design and model application components with precision and clarity.
-
Technology Layer: Embracing the Technology layer of the ArchiCode domain empowers you to delve into the realm of deployment nodes, strategically configuring your architecture’s technological aspects.
-
Viewpoint and Views: Navigating within the ArchiCode domain grants you access to a spectrum of viewpoints and customizable views, facilitating effective architectural communication and visualization.
-
Technical Configuration: The ArchiCode domain encompasses essential technical configurations, enabling you to tailor the tool to your specific architectural requirements.
As we delve into each facet of the ArchiCode domain, you’ll gain a comprehensive understanding of how each element contributes to your architectural prowess. Let’s embark on a guided exploration through the diverse dimensions of the ArchiCode domain.
Workspace
In ArchiCode, a workspace is a fundamental construct that orchestrates the foundation of your architectural endeavors. It acts as a cohesive hub, streamlining the definition and configuration of your architecture work. Key aspects of the workspace include:
-
Plain Text Format: A workspace is represented as a plain text file, allowing you to choose between YAML, TOML, or JSON formats. This flexibility ensures that the workspace aligns seamlessly with your preferred configuration style.
-
Centralized Definition and Configuration: The workspace serves as a central repository for defining and configuring your architecture work. This consolidation streamlines your workflow and provides a clear reference point for all aspects of your project.
-
Enrichment with Manifests: Workspaces can be enriched through the inclusion of manifests. A manifest, also presented as a plain text file in YAML, TOML, or JSON format, further refines and specifies architectural details within the workspace.
-
Manifest for Enhanced Organization: The concept of manifests introduces a structural layer that enhances source code organization. By encapsulating architectural components, manifests contribute to a cleaner and more comprehensible separation of concerns.
-
Collaboration Support: Embracing the manifest concept not only refines source code organization but also provides enhanced collaboration capabilities. Manifests facilitate clearer communication among team members by offering a well-defined structure and purpose.
The following snippet describes a workspace designing the CommandLineInterface container of the ArchiCode system and its localization in the Reference environment.
workspace.yamlapplication:
elements:
- kind: "system"
id: "ArchiCode"
elements:
- kind: "container"
id: "CommandLineInterface"
qualifier:
- "Quarkus"
technology:
elements:
- kind: "environment"
id: "Reference"
elements:
- kind: "node"
id: "Laptop"
applications:
- "ArchiCode.CommandLineInterface"The next one, shows the default properties of a workspace.
application: {}
technology: {}
settings:
  manifests:
    paths:
    - "manifests"
  relationships:
    default-synthetic-label: "uses"
  views:
    path: "views"
  facets:
    globalEnabled: true
    directoryNameTemplate: "%s-%s"
styles:
  atomic:
    shadowing: false
  composite:
    shadowing: false
    background-color: "transparent"
    line-color: "darkgray"
    line-style: 5
    font-style: "normal"
formatters:
  atomic:
    name: "%s"
    qualifiers: "%s"
    description: "%s"
  composite:
    name: "%s"
    qualifiers: "%s"
  link:
    label: "%s"
    qualifiers: "%s"
The following snippet describes a manifest designing the User person and is relationship with the CommandLineInterface container.
manifests/user.yamlheader:
kind: "archicode.morin.io/person"
version: "1"
content:
id: "User"
relationships:
- destination: "ArchiCode.CommandLineInterface"
qualifiers:
- "Console"Incorporating workspaces and manifests into your architectural workflow within ArchiCode empowers you with an efficient and organized foundation for your projects. Let’s explore further as we navigate through the various dimensions of the ArchiCode domain.
Application Layer
In ArchiCode, the Application Layer embodies a pivotal aspect of your architectural design, harmonizing with both the ArchiMate Standard and the C4 Model. Key insights into the Application Layer include:
-
Correlation with ArchiMate: Drawing inspiration from the ArchiMate Standard, ArchiCode’s Application Layer mirrors the Application Layer within the ArchiMate framework.
-
Structural Focus: ArchiCode delves specifically into the structural realm of the Application Layer. It emphasizes the "Structure" aspect of ArchiMate, enabling architects to design and define the composition of application components.
-
Alignment with C4 Model: Building upon the alignment with ArchiMate, ArchiCode’s Application Layer extends its compatibility to the C4 Model. This alignment, inclusive of a unique "Solution" element, complements the foundational "System" element, enriching the architectural vocabulary.
Composition
-
Solutions and Systems: At the apex of the Application Layer, you encounter "Solutions" and "Systems." A Solution encapsulates one or more Systems, establishing a higher-level conceptual grouping.
-
Systems and Containers: Delving deeper, a "System" encompasses "Containers," delineating the delineating technological boundaries of your architecture. These Containers form the backbone of your application’s operational flow.
-
Containers and Components: Within each Container resides a multitude of "Components," embodying the granular building blocks of your architecture. These Components epitomize the specific functionalities that drive your application’s behavior.
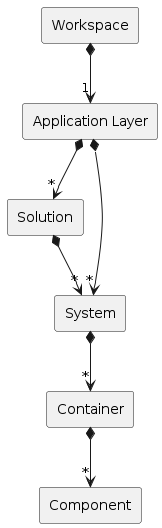
This hierarchical structure empowers you to systematically model and articulate the intricate relationships and dependencies between Solutions, Systems, Containers, and Components within your architectural design.
Solution
In the context of the ArchiCode domain, the concept of "Solutions" takes on a pivotal role, particularly when orchestrating architectural endeavors that span multiple systems. Here’s a closer look at the significance of Solutions:
-
Multi-System Scope: Solutions come to the forefront when your architecture work extends its reach across multiple systems. They provide a coherent and organized approach to manage and address the complexities that arise from a diverse ecosystem of interconnected systems.
-
Holistic View: By grouping related Systems under a common Solution, you achieve a holistic and top-level perspective. This organizational structure allows you to grasp the overarching design intent and align it seamlessly with the intricacies of your multi-system architecture.
-
Modularity and Scalability: Solutions inherently promote modularity and scalability. They enable you to encapsulate specific sets of Systems, facilitating targeted enhancements, updates, and expansions while maintaining a clear demarcation of responsibilities.
-
Efficient Management: Solutions offer an efficient management framework, streamlining the handling of interdependencies, resource allocation, and cross-cutting concerns across Systems. This, in turn, fosters improved coordination and resource utilization.
-
Enhanced Communication: Solutions enhance communication by providing a concise reference point for discussing architectural decisions and rationale. This clarity aids in effective collaboration among stakeholders, ensuring everyone shares a common understanding of the architectural landscape.
Incorporating Solutions into your architectural repertoire within ArchiCode empowers you to navigate the complexities of multi-system architectures with finesse, coherence, and strategic foresight.
header:
  kind: "archicode.morin.io/solution"
  version: "1"
content:
  id: "ArchiTool"
System
In the ArchiCode domain, the concept of a "System" resonates harmoniously with the counterpart found in the C4 Model.
header:
  kind: "archicode.morin.io/system"
  version: "1"
  parent: "ArchiTool"
content:
  id: "ArchiCode"
Container
Within the ArchiCode domain, the concept of a "Container" maintains a parallel equivalence with its counterpart in the C4 Model.
header:
  kind: "archicode.morin.io/container"
  version: "1"
  parent: "ArchiTool.ArchiCode"
content:
  id: "CommandLineInterface"
Component
In the realm of the ArchiCode domain, the concept of a "Component" resonates in harmony with its counterpart within the C4 Model.
header:
  kind: "archicode.morin.io/component"
  version: "1"
  parent: "ArchiTool.ArchiCode.CommandLineInterface"
content:
  id: "ViewpointManagement"
Technology Layer
In the ArchiCode domain, the "Technology Layer" emerges as a pivotal facet that resonates with both the ArchiMate Standard and the Deployment representations within the C4 Model.Here’s a comprehensive exploration of this layer:
-
Correlation with ArchiMate: Mirroring the ArchiMate framework, ArchiCode’s Technology Layer corresponds to the "Technology Layer" within ArchiMate.This alignment facilitates a seamless integration of architectural principles across domains.
-
Structural Focus: ArchiCode, delves into the structural aspect of the Technology Layer.It exclusively emphasizes the "Structure" facet of ArchiMate, enabling architects to meticulously model and define the composition of technological elements that underpin your architecture.
-
Equivalence with C4 Model: The Technology Layer in ArchiCode aligns with the Deployment representations found within the C4 Model. However, ArchiCode simplifies this representation by reducing to two foundational elements: "Environment" and "Node." These elements encapsulate the essence of the Technology Layer, providing a streamlined yet comprehensive view of technological aspects.
Composition
Within the ArchiCode domain, the Technology Layer unfolds as a structured hierarchy, comprising essential elements that contribute to the technological fabric of your architecture. Let’s delve into this composition:
-
Environments and Nodes: At the forefront of the Technology Layer, you encounter "Environments" and "Nodes." An Environment encapsulates one or more Nodes, forming a high-level organizational unit that represents distinct technological contexts.
-
Nodes and Sub-Nodes: Delving deeper, a "Node" encompasses both "Nodes" and "Sub-Nodes." This hierarchical arrangement enables the precise delineation of technological elements, allowing for finer-grained representation and definition.
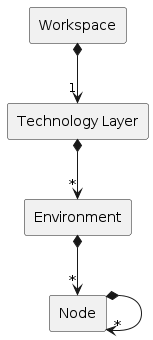
Within this framework, you gain the ability to systematically depict and elucidate the complex interactions, dependencies, and relationships that exist among Environments, Nodes, and Sub-Nodes within your technological architecture.
Environment
In the ArchiCode domain, the concept of an "Environment" resonates in parallel with its counterpart within the Deployment representation of the C4 Model.
technology:
  elements:
    - kind: "environment"
      id: "Reference"
Node
Within the ArchiCode domain, the concept of a "Node" aligns harmoniously with its counterpart within the Deployment representation of the C4 Model.
header:
  kind: "archicode.morin.io/node"
  version: "1"
  parent: "Reference"
content:
  id: "Laptop"
  elements:
    - kind: "Node"
      id: "OperatingSystem"
      elements:
        - kind: "Node"
          id: "TerminalSession"
Relationships
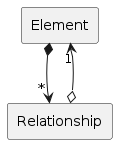
In the ArchiCode domain, relationships serve as essential conduits that navigate the intricate architectural landscape. Let’s delve into the nuances of relationships and their pivotal role within this framework:
-
Interconnection of Elements: A "Relationship" within ArchiCode emerges as a bridge that seamlessly links two "Elements" existing within a singular architectural "Layer." This interconnectedness facilitates a coherent representation of how architectural components interact and collaborate.
-
Layer Interactions: Notably, an "Element" within the Technology Layer possesses the capability to reference an "Element" residing within the Application Layer. This cross-layer referencing enriches your architectural design by articulating dependencies that transcend traditional boundaries.
-
Striking the Balance: ArchiCode takes a deliberate approach in fostering relationships. It promotes the establishment of intricate and in-depth relationships between Elements, enhancing accuracy and authenticity. Simultaneously, at higher levels, ArchiCode employs astute management of synthetic relationships to maintain clarity and comprehensibility.
As you traverse the ArchiCode landscape, you’ll discover that relationships are more than mere connections; they embody the intricate tapestry of your architecture. These relationships intertwine Elements, forging a harmonious narrative that elucidates dependencies, interactions, and the synergy that fuels your architectural vision. In this realm, relationships are not just links; they’re the vital conduits that breathe life into your architectural masterpiece.
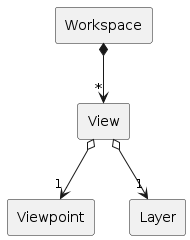
Viewpoints and Views
ArchiCode serves a fundamental purpose: the generation of comprehensive views that illuminate both the Application and Technology layers of your architectural design. This purpose aligns seamlessly with architectural principles and methodologies. Let’s delve into the mechanics that facilitate this purpose within ArchiCode:
-
View Composition in ArchiCode: Within the ArchiCode framework, a "View" emerges as a coherent amalgamation of two crucial components: a "Viewpoint" and a "Layer." This composition ensures that each view encapsulates a well-defined perspective on your architecture.
-
Viewpoint Definition in ArchiCode: In the context of ArchiCode, a "Viewpoint" embodies a set of opinionated and pre-defined rules. These rules play a pivotal role in the extraction and transformation of data. This structuring ensures that views effectively communicate specific architectural aspects.
Composition
Within the ArchiCode workspace, the concept of "Views" plays a pivotal role in portraying architectural insights. Let’s explore the characteristics of Views and their associations within the workspace:
-
View and Viewpoint Association: In the realm of ArchiCode, every View is intrinsically linked to a designated "Viewpoint." This association ensures that each View is curated to encapsulate the viewpoint’s specific perspective on the architectural content.
-
View and Layer Association: Additionally, every View within ArchiCode is associated with a distinct "Layer." This connection anchors the View’s focus to a specific architectural layer, allowing for a clear and structured portrayal of the intended architectural context.
By incorporating Views within the ArchiCode workspace and meticulously associating them with relevant Viewpoints and Layers, you harness a powerful tool for effectively communicating architectural insights. As we continue our exploration of ArchiCode, you’ll delve further into the mechanics of Views and their pivotal role in conveying the depth and breadth of your architectural design.
Views
ArchiCode places a strong emphasis on the dynamic generation of views, fostering a dynamic and adaptable approach to architectural visualization. Here’s how ArchiCode leverages this dynamic view generation:
-
Pluggable Viewpoint Service: ArchiCode harnesses a pluggable Viewpoint Service architecture, enabling the dynamic generation of views that seamlessly align with the elements of both the Application and Technology layers. This extensible framework empowers architects to tailor viewpoints according to their architectural needs.
-
Diverse Architectural Elements: With ArchiCode, the dynamic view generation process taps into the rich spectrum of architectural elements within the Application and Technology layers. This ensures that views are not only comprehensive but also finely tuned to convey the intricacies of your design.
-
Ad-Hoc View Definition: ArchiCode takes flexibility a step further by allowing architects to define ad-hoc views. This empowers you to create specialized viewpoints that cater to specific architectural inquiries or scenarios, providing an extra layer of customization.
technology:
  elements:
    - kind: "environment"
      id: "Reference"
      elements:
        - kind: "Node"
          id: "Laptop"
          elements:
            - kind: "Node"
              id: "OperatingSystem"
              elements:
                - kind: "Node"
                  id: "TerminalSession"
views:
  - kind: "view"
    viewpoint: "overview"
    layer: "technology"
    properties:
      element: "Reference.Laptop.OperatingSystem.TechnicalSession"
By embracing dynamic view generation, leveraging pluggable Viewpoint Services, and facilitating ad-hoc view definitions, ArchiCode equips architects with a toolkit for capturing, communicating, and exploring architectural insights in a dynamic and tailored manner. As we navigate deeper into ArchiCode’s capabilities, you’ll uncover the rendering of views and how they enhance your architectural workflow.
Rendering
ArchiCode introduces a systematic approach to rendering views, enriching architectural communication through visualization. Here’s how ArchiCode orchestrates the process of rendering views:
-
View Rendering Mechanism: Within ArchiCode, each View is rendered by a designated "Renderer." This integral component takes the architectural model and translates it into tangible artifacts that resonate with the end user, facilitating a comprehensive understanding of the design.
-
Renderer Definition: A "Renderer" within ArchiCode embodies a set of opinionated and pre-defined rules. These rules are specifically tailored to generate artifacts that eloquently present architectural insights, ensuring consistency and clarity in communication.
-
Pluggable Renderer Service: ArchiCode harnesses a pluggable Renderer Service architecture, enabling seamless integration and utilization of diverse renderers. This extensibility empowers architects to choose the most suitable renderer for the intended audience or purpose.
By introducing a robust rendering mechanism, employing opinionated rules for artifact generation, and facilitating the pluggable Renderer Service, ArchiCode enhances architectural communication by transforming abstract architectural concepts into tangible representations.
Technical Configuration
ArchiCode embraces configurability as a cornerstone of its design, affording you the ability to tailor the tool to align seamlessly with your architectural needs. Here’s a comprehensive look at ArchiCode’s configuration capabilities:
-
Opinionated Default Configuration: Out of the box, ArchiCode ships with an opinionated and carefully crafted default configuration. This configuration sets the tone for a seamless and intuitive architectural experience.
-
Workspace-Specific Customization: ArchiCode extends the flexibility of configuration to your workspace. The default configuration can be effortlessly customized, allowing you to fine-tune settings and preferences to match the unique demands of your architectural endeavor.
-
Manifest Localization: ArchiCode acknowledges the importance of manifest localization. This localization can be dynamically modified, enabling you to adapt and align the tool’s behavior with your project’s localization requirements.
-
Tailored View Generation: ArchiCode’s configurability extends to the very essence of view generation. You have the ability to redefine the output folder for generated views, as well as customize the labels utilized in the built-in viewpoints. This level of customization ensures that the generated views align harmoniously with your architectural narrative.
settings:
  manifests:
    paths:
    - "manifests"
  relationships:
    default-synthetic-label: "uses"
  views:
    path: "views"
  facets:
    globalEnabled: true
directoryNameTemplate: "%s-%s"styles:
composite:
shadowing: false
background-color: "transparent"
line-color: "darkgray"
line-style: 5
font-style: "normal"formatters:
atomic:
name: "%s"
qualifiers: "%s"
description: "%s"
composite:
name: "%s"
qualifiers: "%s"
link:
label: "%s"
qualifiers: "%s"By affording you the capability to tailor the configuration of ArchiCode, the tool seamlessly integrates with your architectural process, providing a personalized and adaptable framework.
Commands
Within the realm of ArchiCode, an array of meticulously designed commands empowers you to wield precision and control over your architectural workspace. Let’s delve into ArchiCode’s command utilities, which enable you to seamlessly generate views and explore the intricacies of your workspace’s data model:
-
View Generation Commands: ArchiCode offers a range of commands dedicated to the seamless generation of views situated within your workspace. These commands enable you to customize the generation of views, providing a streamlined approach to shaping your architectural visualization.
-
Data Model Querying Commands: ArchiCode equips you with specialized commands designed to query the intricate data model of your workspace. These commands serve as a window into your architecture’s foundational elements, facilitating insightful exploration and analysis.
As you delve deeper into the Command section of ArchiCode’s documentation, you’ll uncover the diverse set of commands at your disposal, each contributing to a more intuitive, efficient, and informed architectural workflow. Let’s embark on this journey through the realm of ArchiCode’s commands, discovering how they enhance your ability to shape, explore, and communicate architectural concepts.
Generate views
archicode views generate --helpThe "Generate Views" command within ArchiCode serves as a dynamic catalyst for creating comprehensive architectural views. This command is designed to efficiently produce visual representations of your architecture, aiding communication and understanding. Here’s a comprehensive breakdown of its functionality:
-
Triggering View Generation: The "Generate Views" command is the key that unlocks the process of generating architectural views. Upon invocation, ArchiCode springs into action, initiating the creation of visual artifacts that encapsulate your architectural design.
-
Default Behavior: By default, this command leverages the power of discovery. It automatically identifies and generates views based on the elements present within both the Application Layer and the Technology Layer of your architecture.
-
Inclusive Viewpoint Generation: The default behavior extends to encompass all available viewpoints. This means that ArchiCode generates views for a comprehensive range of architectural perspectives, enabling a holistic portrayal of your design.
-
Built-in Renderer Integration: By default, the "Generate Views" command uses the ArchiCode’s Plantuml Renderer. This integration ensures that the generated views are easily understandable and sharable.
-
Organized Output: By default, the command orchestrates the organization of generated views within a dedicated "views" folder, nested within your workspace folder. This structured arrangement enhances clarity and enables efficient access to your visual representations.
The command offers also customization Capabilities:
-
Selective View Rendering: The power of customization lies in your hands. The command can be tailored to render specific views based on their unique identifier, providing you with control over the scope of generated visualizations.
archicode views generate --view-id=view_a --view-id=view_b-
Renderer Engine Flexibility: You have the freedom to opt for a preferred Renderer Engine. The command allows you to specify a particular engine, aligning the rendering process with your architectural preferences.
archicode views generate --engine=kubernetes-network-policies-
Fine-Tuned View Properties: Further customization extends to individual view properties. ArchiCode empowers you to specify custom properties, ensuring that the generated views align precisely with your architectural objectives.
archicode views generate --properties='{ "key" : "value" }'Query views
archicode query views --helpThe "Query Views" command within ArchiCode offers a versatile toolkit for precise exploration and customization of architectural views. Here’s an in-depth look at the capabilities and features of the "Query Views" command:
-
Default Behavior: As a testament to flexibility, the "Query Views" command, by default, refrains from applying any filtering or formatting. This ensures that you have the freedom to explore your architectural views without any predetermined constraints.
-
Focused Exploration: The essence of the "Query Views" command lies in its ability to fine-tune your exploration. Designed with precision in mind, this command empowers you to filter and tailor your view output according to your architectural inquiries.
The command offers also customization Capabilities:
-
Dynamic Filtering: The command harnesses the power of JSON Path, enabling you to apply intricate filters that delve deep into the View model. This dynamic filtering mechanism facilitates targeted extraction of specific architectural insights.
archicode query views -q '$.[?(@.viewpoint=="deep")]'-
Customizable Output Formats: ArchiCode’s "Query Views" command extends flexibility by supporting various output formats, including YAML, TOML, JSON, and a customizable option. This ensures that your extracted data aligns seamlessly with your preferred format.
archicode query views -f toml-
Template-Based Customization: The command’s customizable output format integrates a template-based approach. By leveraging the Velocity template engine, you can define specific output structures tailored to your architectural needs.
archicode query views -f custom -t '$d.e("$.[*].id")'Generate JSON Schemas
archicode query schemas --helpThe "Generate JSON Schema" command within ArchiCode unlocks a world of enhanced coding experiences, seamlessly integrating precision and structure into your architectural design process. Here’s a comprehensive look at its capabilities:
-
Workspace Model Schema: With the "Generate JSON Schema" command, ArchiCode empowers you to effortlessly create the JSON Schema of the Workspace metamodel.
archicode query schemas workspace-
Manifest Model Schema: The command further extends its prowess to generate the JSON Schema for the Manifest metamodel.
archicode query schemas manifest-
IDE Integration and Coding: By integrating the generated JSON Schema into your Integrated Development Environment (IDE), your coding experience is enriched. The schema acts as a guiding framework, offering autocompletion, validation, and insights that elevate your coding accuracy and efficiency.
Best Practices
Welcome to the "Best Practices" segment of ArchiCode, where we embark on a journey of refining your architectural prowess and optimizing your workflow. This section delves into a comprehensive array of practices that elevate your architectural design, foster collaboration, and streamline your processes. Let’s delve into the key areas this part covers:
-
Design Guidelines: Discover the art of shaping architectural solutions through structured design guidelines. Learn how to create cohesive, effective, and aesthetically pleasing designs that embody architectural excellence.
-
Source Code Organization: Uncover strategies for maintaining a well-organized source code that mirrors the intricacies of your architectural vision. Efficient source code organization fosters clarity, modularity, and ease of collaboration.
-
Diagrams Styling: Dive into the world of diagrams styling, where visual aesthetics meet informative clarity. Explore techniques to create diagrams that are not only visually appealing but also convey complex architectural concepts with precision.
-
Label Formatting: Master the art of label formatting, transforming textual elements into powerful conveyors of architectural information. Learn how to structure labels to enhance comprehension and create meaningful visual cues.
-
Viewpoint Utilization: Harness the full potential of viewpoints to construct insightful architectural narratives. Explore the strategic utilization of viewpoints to effectively communicate various aspects of your architecture to different stakeholders.
-
CI/CD Integration: Seamlessly integrate ArchiCode into your Continuous Integration/Continuous Deployment (CI/CD) pipeline. Learn how to make architectural design an integral part of your development lifecycle, ensuring consistent and aligned practices.
Through these best practices, you’ll unlock the tools and techniques that enable you to transform architectural concepts into tangible realities. Join us as we journey through each facet, unraveling the strategies that contribute to architectural excellence, effective communication, and the harmonious integration of ArchiCode into your architectural process.
Design Guidelines
Incremental and In-Depth Design Approach
ArchiCode advocates an architectural design philosophy characterized by incremental refinement and in-depth exploration. This approach empowers architects to craft well-structured and comprehensive designs that capture the essence of architectural vision. Let’s delve into the tenets of this methodology:
-
Iterative Refinement: In the journey of architectural creation, ArchiCode encourages an iterative process. The model evolves incrementally, starting from the highest levels of abstraction and cascading down to the minutiae of detail. This iterative refinement ensures a nuanced and coherent architectural representation.
-
Layered Depth: With each iteration, the model’s depth is progressively enriched. As elements are introduced, relationships between them are also refined, layer by layer. This gradual deepening ensures that architectural intricacies are meticulously captured, leading to a holistic and accurate depiction.
-
Relationship Refinement: Just as elements undergo iterative enhancements, relationships between them also follow the same iterative path. The relationships are fine-tuned and perfected, aligning with the evolving architectural narrative.
-
Clarity in Relationship Hierarchy: ArchiCode empowers architects to prune relationships for clarity. In instances where higher-level relationships are encompassed by those of lower levels, these higher-level relationships can be refined or omitted, ensuring that the architectural landscape remains lucid and uncluttered.
-
Synthetic Relationship Generation: A distinctive feature of ArchiCode’s built-in Viewpoints lies in their ability to generate synthetic relationships. This intentional design prevents sibling relationships from infiltrating the views, preserving the purity and coherence of each view’s focus.
By embracing ArchiCode’s incremental and in-depth design approach, architects embark on a transformative journey of iterative refinement. This methodology ensures that architectural designs are not only comprehensive but also well-structured, intelligible, and unburdened by unnecessary clutter.
Example: An ecommerce platform
Introduction
In the realm of software architecture, ArchiCode stands as a versatile tool that facilitates the systematic design and refinement of intricate systems. In this example, we embark on an iterative journey to architect an e-commerce platform, revealing how ArchiCode empowers architects to create coherent and well-defined architectural models. We commence by identifying high-level elements and relationships, progressively breaking down the system into specialized containers and interactions. Notably, while the outlined steps establish a structured foundation, ArchiCode’s true strength lies in its adaptability, enabling architects to customize the process to fit the unique demands of their projects. As we delve into this exploration, ArchiCode emerges as a dynamic instrument, empowering architects to craft intricate architectural designs that seamlessly connect vision with implementation.
Step #1: Shape the highest elements of the application layer
In this initial step, we identify the foundational elements of the application layer:
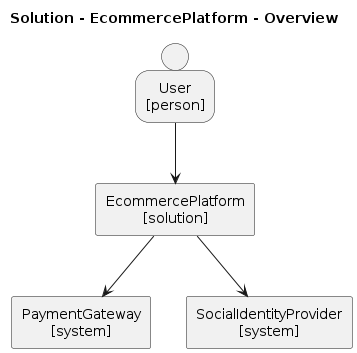
-
EcommercePlatform: At the core of the system, "EcommercePlatform" is identified as the solution itself, representing the entire e-commerce platform.
-
User: This element represents the users who interact with the e-commerce platform, browse products, and make purchases.
-
SocialIdentityProvider: External services such as Google and Microsoft are designated as "SocialIdentityProvider," responsible for authenticating users.
-
PaymentGateway: The element symbolizes external payment processing services like Stripe and Braintree that facilitate secure financial transactions.
workspace.yamlapplication:
elements:
- kind: "person"
id: "User"
- kind: "solution"
id: "EcommercePlatform"
- kind: "system"
id: "SocialIdentityProvider"
- kind: "system"
id: "PaymentGateway"Once the elements are identified, we design the relationships between them:
-
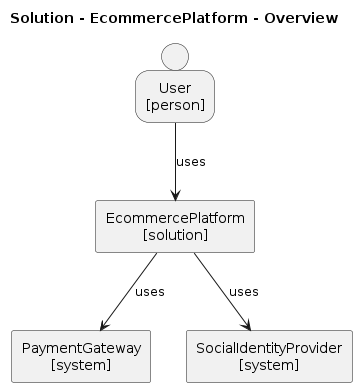
User uses EcommercePlatform: A direct relationship is established from the "User" element to the "EcommercePlatform" element. This relationship signifies that users engage with the platform to explore products, make purchases, and manage their accounts.
-
EcommercePlatform leverages SocialIdentityProvider: A relationship is created from "EcommercePlatform" to "SocialIdentityProvider" to depict the platform’s reliance on external authentication services. This connection ensures a seamless and secure login process for users through trusted identity providers.
-
EcommercePlatform leverages PaymentGateway: Another relationship is formed from "EcommercePlatform" to "PaymentGateway" to illustrate the platform’s integration with external payment processing services. Through this relationship, the platform enables customers to complete transactions using various payment methods.
workspace.yamlapplication:
elements:
- kind: "person"
id: "User"
- kind: "solution"
id: "EcommercePlatform"
- kind: "system"
id: "SocialIdentityProvider"
- kind: "system"
id: "PaymentGateway"After establishing the relationships, the next task involves generating a first generation of views:
-
Overview Viewpoint: At this level of abstraction, the "Overview" viewpoint is the most suitable. This viewpoint provides a broad perspective of the relationships and interactions related to the e-commerce platform.
-
Ingress and Egress Relationships: The viewpoint showcases the "Ingress" relationships, highlighting how elements such as "User" enter the platform. Additionally, it depicts "Egress" relationships, illustrating how the platform interact with dependencies.
archicode views generate --viewpoint=overviewThe command generates four Plantuml files in the ./views/plantuml/application folder:
-
EcommercePlatform_overview.puml -
PaymentGateway_overview.puml -
SocialIdentityProvider_overview.puml -
User_overview.puml
The view EcommercePlatform_overview.puml is built upon the "Overview" viewpoint and focus on the Ingress and Egress relationships where the EcommercePlatform element is involved.
The view PaymentGateway-overview.puml is built upon the "Overview" viewpoint and focus on the Ingress and Egress relationships where the PaymentGateway element is involved.
The concept is similar for the others generated views.
This initial step established a clear foundation by identifying the key elements and relationships within the e-commerce platform’s application layer.
Step #2: Identify the systems of the solution
In this step, we delve deeper into the systems that compose the e-commerce platform and establish relationships between them.
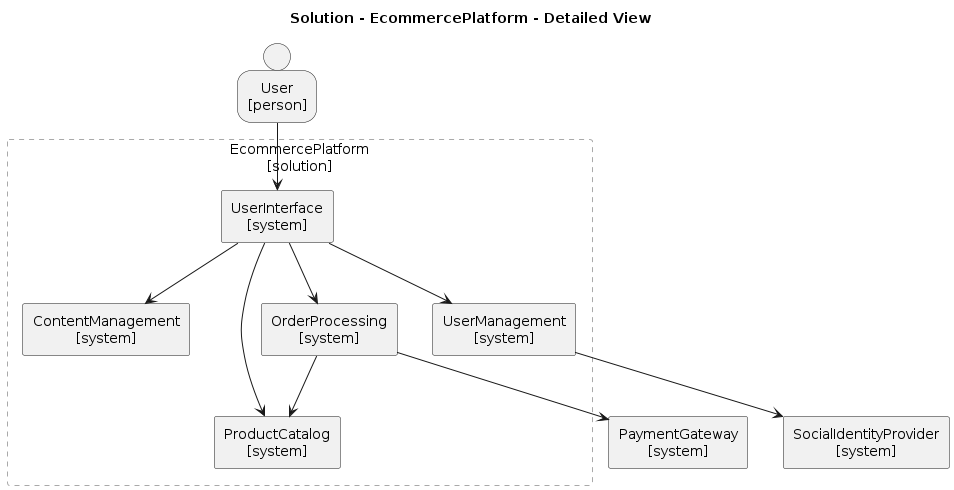
The first task involves breaking down the "EcommercePlatform" Solution into distinct "System" elements, each responsible for specific functionalities:
-
Product Catalog: Manages product categorization, listings, and details.
-
User Management: Handles user authentication, profiles, and preferences.
-
Order Processing: Facilitates order creation, payment processing, and order tracking.
-
Content Management: Manages website content, including product descriptions and promotional banners.
-
User Interface: Provides personalized product recommendations based on user behavior.
workspace.yamlapplication:
elements:
- kind: "person"
id: "User"
relationships:
- destination: "EcommercePlatform"
- kind: "solution"
id: "EcommercePlatform"
relationships:
- destination: "SocialIdentityProvider"
- destination: "PaymentGateway"
elements:
- kind: "system"
id: "UserInterface"
- kind: "system"
id: "ProductCatalog"
- kind: "system"
id: "UserManagement"
- kind: "system"
id: "OrderProcessing"
- kind: "system"
id: "ContentManagement"
- kind: "system"
id: "SocialIdentityProvider"
- kind: "system"
id: "PaymentGateway"The second task focuses on designing relationships between the newly defined "System" elements:
-
User Interface → Product Catalog: The "User Interface" system interacts with the "Product Catalog" system to present products to users and allow browsing and selection.
-
User Interface → User Management: The "User Interface" system communicates with the "User Management" system to manage user authentication and profile-related interactions.
-
User Interface → Order Processing: The "User Interface" system connects with the "Order Processing" system to handle order creation and transaction processing.
-
User Interface → Content Management: The "User Interface" system engages with the "Content Management" system to display dynamic website content to users.
-
User Management → Social Identity Provider: The "User Management" system integrates with external "Social Identity Providers" to ensure secure user authentication and identity verification.
-
Order Processing → Product Catalog: The "Order Processing" system collaborates with the "Product Catalog" system to validate product availability and manage order-related information.
-
Order Processing → Payment Gateway: The "Order Processing" system interfaces with external "Payment Gateway" services to facilitate secure payment processing and transaction completion.
workspace.yamlapplication:
elements:
- kind: "person"
id: "User"
relationships:
- destination: "EcommercePlatform"
- kind: "solution"
id: "EcommercePlatform"
relationships:
- destination: "SocialIdentityProvider"
- destination: "PaymentGateway"
elements:
- kind: "system"
id: "UserInterface"
relationships:
- destination: "EcommercePlatform.ProductCatalog"
- destination: "EcommercePlatform.UserManagement"
- destination: "EcommercePlatform.OrderProcessing"
- destination: "EcommercePlatform.ContentManagement"
- kind: "system"
id: "ProductCatalog"
- kind: "system"
id: "UserManagement"
relationships:
- destination: "SocialIdentityProvider"
- kind: "system"
id: "OrderProcessing"
relationships:
- destination: "EcommercePlatform.ProductCatalog"
- destination: "PaymentGateway"
- kind: "system"
id: "ContentManagement"
- kind: "system"
id: "SocialIdentityProvider"
- kind: "system"
id: "PaymentGateway"In the third task, we refine the "Ingress" and "Egress" relationships of the "EcommercePlatform" Solution element to enhance clarity and streamline the representation:
-
The "Ingress" relationship from "User" can be removed, as it is now covered by the "User Interface" system. User interactions with the authentication and profile management, catalogs, ordering or content functionalities are now directed to the "User Interface" system.
-
The "Egress" relationship from the "EcommercePlatform" to "Social Identity Provider" can be removed, as it is now covered by the "User Management" system’s integration with "Social Identity Providers" for secure user authentication and identity verification.
-
The "Egress" relationship from the "EcommercePlatform" to "Payment Gateway" can be removed, as it is now covered by the "Order Processing" system’s interaction with external "Payment Gateway" services for secure payment processing and transaction completion.
workspace.yamlapplication:
elements:
- kind: "person"
id: "User"
relationships:
- destination: "EcommercePlatform.UserInterface"
- kind: "solution"
id: "EcommercePlatform"
elements:
- kind: "system"
id: "UserInterface"
relationships:
- destination: "EcommercePlatform.ProductCatalog"
- destination: "EcommercePlatform.UserManagement"
- destination: "EcommercePlatform.OrderProcessing"
- destination: "EcommercePlatform.ContentManagement"
- kind: "system"
id: "ProductCatalog"
- kind: "system"
id: "UserManagement"
relationships:
- destination: "SocialIdentityProvider"
- kind: "system"
id: "OrderProcessing"
relationships:
- destination: "EcommercePlatform.ProductCatalog"
- destination: "PaymentGateway"
- kind: "system"
id: "ContentManagement"
- kind: "system"
id: "SocialIdentityProvider"
- kind: "system"
id: "PaymentGateway"Upon refining relationships and elements, we generate detailed views using the "Detailed" viewpoint:
-
Detailed Viewpoint: At this level of abstraction, the "Detailed" viewpoint is most suitable. It provides an in-depth exploration of the interactions between child elements within a given parent element.
-
Ingress and Egress Relationships: The viewpoint showcases the "Ingress" and "Egress" relationships within each "System" element, providing a comprehensive understanding of how functionalities and data flow between systems.
archicode views generate --viewpoint=overview --viewpoint=detailedThe command generates the additional Plantuml files in the ./views/plantuml/application folder.
-
EcommercePlatform.ContentManagement-overview.puml -
EcommercePlatform.OrderProcessing-overview.puml -
EcommercePlatform.ProductCatalog-overview.puml -
EcommercePlatform.UserInterface-overview.puml -
EcommercePlatform.UserManagement-overview.puml -
EcommercePlatform-detailed.puml
The view EcommercePlatform-detailed.puml is built upon the "Detailed" viewpoint and focus on the Ingress and Egress relationships where the children of the EcommercePlatform element are involved.
The view EcommercePlatform.UserInterface-overview.puml is built upon the "Overview" viewpoint and focus on the Ingress and Egress relationships of the UserInterface element.

The view EcommercePlatform-overview.puml is still available but the drawn relationships are now synthetic ones.
The second step focused on the intricate composition of systems within the e-commerce platform and the establishment of relationships between them.
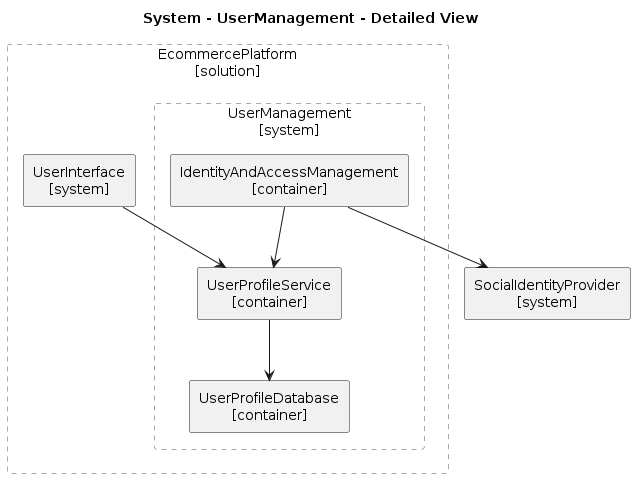
Step #3: Deep dive into User Management
In this step, we shift our focus to the containers that compose the platform’s systems, starting with the "User Management" system, and establish relationships between them.
The first task involves decomposing the "UserManagement" System into distinct "Container" elements, each responsible for specific functionalities:
-
IdentityAndAccessManagement Container: Manages user authentication, login processes, and role-based access control.
-
UserProfile Container: Handles user profile management, including personal information, preferences, and settings.
-
UserProfile Database: Stores and manages user profile data, providing a reliable data source for the UserProfile Container.
workspace.yamlapplication:
elements:
- kind: "person"
id: "User"
relationships:
- destination: "EcommercePlatform.UserInterface"
- kind: "solution"
id: "EcommercePlatform"
elements:
- kind: "system"
id: "UserInterface"
relationships:
- destination: "EcommercePlatform.ProductCatalog"
- destination: "EcommercePlatform.UserManagement"
- destination: "EcommercePlatform.OrderProcessing"
- destination: "EcommercePlatform.ContentManagement"
- kind: "system"
id: "ProductCatalog"
- kind: "system"
id: "UserManagement"
relationships:
- destination: "SocialIdentityProvider"
elements:
- kind: "container"
id: "IdentityAndAccessManagement"
- kind: "container"
id: "UserProfileService"
- kind: "container"
id: "UserProfileDatabase"
- kind: "system"
id: "OrderProcessing"
relationships:
- destination: "EcommercePlatform.ProductCatalog"
- destination: "PaymentGateway"
- kind: "system"
id: "ContentManagement"
- kind: "system"
id: "SocialIdentityProvider"
- kind: "system"
id: "PaymentGateway"The second task focuses on designing relationships between the newly defined "Container" elements:
-
IdentityAndAccessManagement → UserProfileService: The "IdentityAndAccessManagement" Container communicates with the "UserProfileService" Container to provide access to user profile information after successful authentication.
-
UserProfileService → UserProfileDatabase: The "UserProfileService" Container interacts with the "UserProfileDatabase" to store and retrieve user profile data.
workspace.yamlapplication:
elements:
- kind: "person"
id: "User"
relationships:
- destination: "EcommercePlatform.UserInterface"
- kind: "solution"
id: "EcommercePlatform"
elements:
- kind: "system"
id: "UserInterface"
relationships:
- destination: "EcommercePlatform.ProductCatalog"
- destination: "EcommercePlatform.UserManagement"
- destination: "EcommercePlatform.OrderProcessing"
- destination: "EcommercePlatform.ContentManagement"
- kind: "system"
id: "ProductCatalog"
- kind: "system"
id: "UserManagement"
relationships:
- destination: "SocialIdentityProvider"
elements:
- kind: "container"
id: "IdentityAndAccessManagement"
relationships:
- destination: "EcommercePlatform.UserManagement.UserProfileService"
- kind: "container"
id: "UserProfileService"
relationships:
- destination: "EcommercePlatform.UserManagement.UserProfileDatabase"
- kind: "container"
id: "UserProfileDatabase"
- kind: "system"
id: "OrderProcessing"
relationships:
- destination: "EcommercePlatform.ProductCatalog"
- destination: "PaymentGateway"
- kind: "system"
id: "ContentManagement"
- kind: "system"
id: "SocialIdentityProvider"
- kind: "system"
id: "PaymentGateway"In the third task, we refine the "Ingress" and "Egress" relationships of the "UserManagement" System element to enhance clarity and streamline the representation:
-
The "Ingress" relationship from "UserInterface" to "UserManagement" is refined to become "UserInterface" → "UserProfileService". This change reflects the more granular interaction between the "UserInterface" and the dedicated "UserProfileService" container, specifically designed to handle user profile-related operations.
-
The "Egress" relationship from "UserManagement" to "SocialIdentityProvider" is refined to become "IdentityAndAccessManagement" → "SocialIdentityProvider". This adjustment aligns with the system’s architecture, where the "IdentityAndAccessManagement" container handles interactions with "Social Identity Providers" for secure user authentication and identity verification.
workspace.yamlapplication:
elements:
- kind: "person"
id: "User"
relationships:
- destination: "EcommercePlatform.UserInterface"
- kind: "solution"
id: "EcommercePlatform"
elements:
- kind: "system"
id: "UserInterface"
relationships:
- destination: "EcommercePlatform.ProductCatalog"
- destination: "EcommercePlatform.UserManagement.UserProfileService"
- destination: "EcommercePlatform.OrderProcessing"
- destination: "EcommercePlatform.ContentManagement"
- kind: "system"
id: "ProductCatalog"
- kind: "system"
id: "UserManagement"
elements:
- kind: "container"
id: "IdentityAndAccessManagement"
relationships:
- destination: "EcommercePlatform.UserManagement.UserProfileService"
- destination: "SocialIdentityProvider"
- kind: "container"
id: "UserProfileService"
relationships:
- destination: "EcommercePlatform.UserManagement.UserProfileDatabase"
- kind: "container"
id: "UserProfileDatabase"
- kind: "system"
id: "OrderProcessing"
relationships:
- destination: "EcommercePlatform.ProductCatalog"
- destination: "PaymentGateway"
- kind: "system"
id: "ContentManagement"
- kind: "system"
id: "SocialIdentityProvider"
- kind: "system"
id: "PaymentGateway"Upon refining relationships and elements, we generate detailed views using the "Deep" viewpoint:
-
Deep Viewpoint: At this level of abstraction, the "Deep" viewpoint is relevant. It provides an exploration of the "Ingress" and "Egress" relationships on descendants of a given element, offering a comprehensive understanding of interactions within the system.
-
Ingress and Egress Relationships: The viewpoint showcases the "Ingress" and "Egress" relationships within each "Container" element of the "UserManagement" System, providing detailed insights into how functionalities and data flow within the system.
archicode views generateThe command generates many Plantuml files in the ./views/plantuml/application folder.
The view EcommercePlatform-deep.puml is built upon the "Deep" viewpoint and focus on the Ingress and Egress relationships involving the descendants of the EcommercePlatform element.
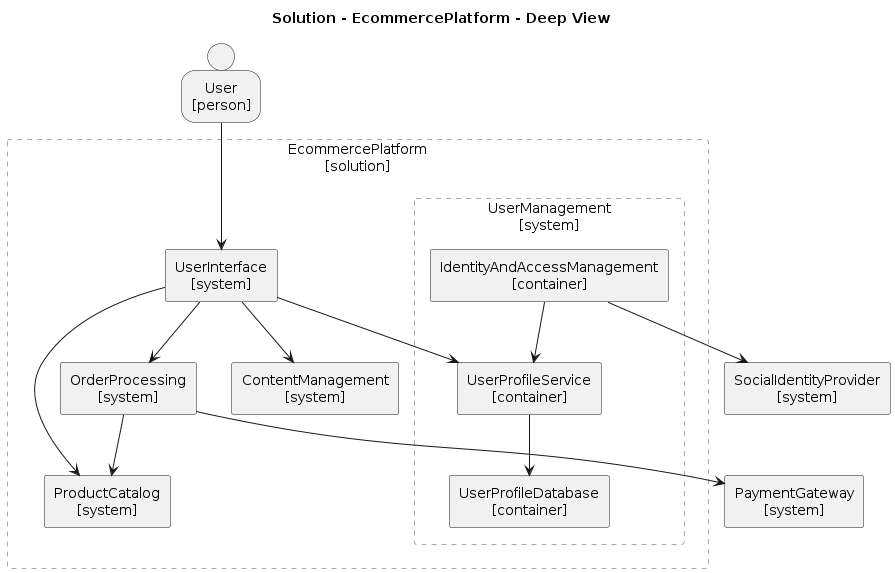
The view EcommercePlatform.UserManagement-detailed is built upon the "Detailed" viewpoint and focus on the Ingress and Egress relationships involving the children of the UserManagement element.
The third step focused on the composition of containers within the "User Management" system, the establishment of relationships between them as well as the refinement of existing relationships.
Conclusion
The iterative process outlined in this example serves as a foundational framework for designing and refining the architecture of an e-commerce platform using ArchiCode. It provides a structured approach to create a clear and organized representation of system elements, their relationships, and interactions. However, it is important to recognize that this process acts as a flexible backbone, adaptable to the unique needs and complexities of each architectural endeavor.
Each architectural project requires a tailored approach to effectively address its specific requirements. Depending on the project’s scope and goals, the iterative process may be customized to accommodate deeper levels of decomposition, refined naming and qualification of relationships, as well as more detailed descriptions and qualifications of individual elements.
As the design evolves, subsequent iterations may involve further decomposing other elements within the architecture, leading to a more comprehensive and intricate model. Additionally, refining the naming and qualification of relationships enhances clarity and ensures that the architecture accurately reflects the intended interactions.
To effectively communicate the architecture to diverse audiences, customization of styling and formatting becomes essential. Tailoring the visual representation to meet the expectations and preferences of stakeholders ensures that the architectural model is accessible and understandable to all parties involved.
The final stages of the iterative process may encompass the design of the technology layer, where decisions about technologies, platforms, and frameworks are integrated into the architecture. This step bridges the gap between the high-level conceptual design and the practical implementation of the system.
In essence, ArchiCode empowers architects to iteratively design, refine, and communicate complex architectures. By customizing the iterative process and adapting it to the evolving project requirements, architects can create architecture models that effectively guide development decisions, facilitate communication, and lead to the successful realization of sophisticated systems. The collaborative and adaptable nature of ArchiCode empowers architects to navigate the complexities of modern software and system design with confidence.
Tackling view clutter
Introduction
Navigating through complex architectural models often presents a challenge for professionals as intricate details and systematic interactions like authorization or observability make the generated views disordered and complex. As these views become overwhelming, there is an evident need for refined, focused, and organized presentation to enhance clarity and understanding. This is where Archicode steps in, offering an innovative solution to transform this complexity into a streamlined and comprehensible format.
Archicode introduces the facet concept, a feature engineered to automate the generation of secondary workspaces and refine views to focus on specific concerns. By employing transformation rules based on JSON Path queries, facets effectively remove certain elements and relationships, offering a cleaner, focused view of specific subsets. This feature serves as a bridge from the chaos of detailed expressions to an organized, easily understandable visualization, paving the way for enhanced insights into complex architectural models.
Step #1: Create the main workspace
In this initial phase, establishing a well-defined workspace is paramount. We’re essentially laying down the groundwork where all subsequent actions and implementations will take place. We revert to a previous model - an ecommerce platform - to set this stage, ensuring we have a tangible, relatable context for the steps that will follow.
In this code snippet, we illustrate the initial configuration and elements included in the workspace.yaml file. This is the foundation upon which the ecommerce platform model is built.
workspace.yamlapplication:
elements:
- kind: "person"
id: "User"
relationships:
- destination: "EcommercePlatform.UserInterface"
- kind: "solution"
id: "EcommercePlatform"
elements:
- kind: "system"
id: "UserInterface"
relationships:
- destination: "EcommercePlatform.ProductCatalog"
- destination: "EcommercePlatform.UserManagement.UserProfileService"
- destination: "EcommercePlatform.OrderProcessing"
- destination: "EcommercePlatform.ContentManagement"
- kind: "system"
id: "ProductCatalog"
- kind: "system"
id: "UserManagement"
elements:
- kind: "container"
id: "IdentityAndAccessManagement"
relationships:
- destination: "EcommercePlatform.UserManagement.UserProfileService"
- destination: "SocialIdentityProvider"
- kind: "container"
id: "UserProfileService"
relationships:
- destination: "EcommercePlatform.UserManagement.UserProfileDatabase"
- kind: "container"
id: "UserProfileDatabase"
- kind: "system"
id: "OrderProcessing"
relationships:
- destination: "EcommercePlatform.ProductCatalog"
- destination: "PaymentGateway"
- kind: "system"
id: "ContentManagement"
- kind: "system"
id: "SocialIdentityProvider"
- kind: "system"
id: "PaymentGateway"Here, we execute a command to generate the views for all viewpoints. It renders the initial complex view of the ecommerce platform, laying down the groundwork for further refinement.
archicode views generate --view=EcommercePlatform-deepThis PlantUML diagram represents the deep view of the ecommerce platform in its initial state. At this stage, all elements and relationships are visible, offering a comprehensive, albeit complex, view of the entire system.

At the conclusion of this step, we have a fully initialized workspace, adorned with the intricate details of the ecommerce platform model. While comprehensive, this view is also complex and can be overwhelming, setting the stage for the introduction of facets to refine and organize these views in the steps to follow.
Step #2: Design the authorization concern
As we step into the second phase of our journey, the focal point shifts towards integrating the authorization concern into our established model. The essence of this step lies in validating Access Tokens, an integral aspect ensuring that every component of the ecommerce platform interacts securely and effectively with the IAM component services.
In the context of the ecommerce platform, every component’s interaction is bound by the validation of Access Tokens. We’re designing relationships between the components of the ecommerce platform and the IAM component, all qualified with the term oidc.
We expand the workspace.yaml file to integrate the oidic relationships. It captures the intricate connections between the ecommerce platform components and the IAM component, emphasizing the validation of Access Tokens.
workspace.yaml with the oidc relationshipsapplication:
elements:
- kind: "person"
id: "User"
relationships:
- destination: "EcommercePlatform.UserInterface"
- kind: "solution"
id: "EcommercePlatform"
elements:
- kind: "system"
id: "UserInterface"
relationships:
- destination: "EcommercePlatform.ProductCatalog"
- destination: "EcommercePlatform.UserManagement.UserProfileService"
- destination: "EcommercePlatform.OrderProcessing"
- destination: "EcommercePlatform.ContentManagement"
- kind: "system"
id: "ProductCatalog"
relationships:
- destination: "EcommercePlatform.UserManagement.IdentityAndAccessManagement"
qualifiers: ["oidc"]
- kind: "system"
id: "UserManagement"
elements:
- kind: "container"
id: "IdentityAndAccessManagement"
relationships:
- destination: "EcommercePlatform.UserManagement.UserProfileService"
- destination: "SocialIdentityProvider"
- kind: "container"
id: "UserProfileService"
relationships:
- destination: "EcommercePlatform.UserManagement.UserProfileDatabase"
- destination: "EcommercePlatform.UserManagement.IdentityAndAccessManagement"
qualifiers: [ "oidc" ]
- kind: "container"
id: "UserProfileDatabase"
- kind: "system"
id: "OrderProcessing"
relationships:
- destination: "EcommercePlatform.ProductCatalog"
- destination: "PaymentGateway"
- destination: "EcommercePlatform.UserManagement.IdentityAndAccessManagement"
qualifiers: [ "oidc" ]
- kind: "system"
id: "ContentManagement"
relationships:
- destination: "EcommercePlatform.UserManagement.IdentityAndAccessManagement"
qualifiers: [ "oidc" ]
- kind: "system"
id: "SocialIdentityProvider"
- kind: "system"
id: "PaymentGateway"A command is executed to refresh the views, reflecting the newly integrated authorization relationships. This allows for a visualization of how the authorization concern is woven into the ecommerce platform model.
archicode views generate --view=EcommercePlatform-deepWith the inclusion of authorization relationships, the PlantUML diagram unveils a more detailed view of the ecommerce platform. The oidc relationships are distinctly highlighted, offering insights into the integration of the authorization concern.
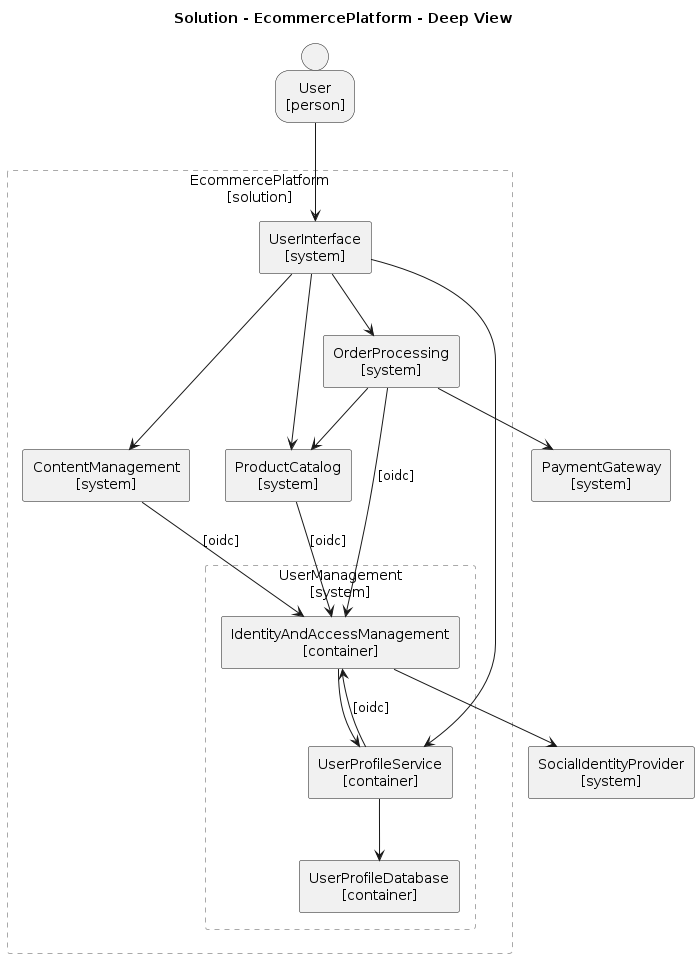
By the end of Step #2, the authorization concern is intricately integrated into the ecommerce platform model. The oidc relationships are now visible, marking the onset of a more detailed, yet complex, visualization. This complexity underscores the need for a mechanism to refine and focus the views for enhanced clarity, leading us to the subsequent steps where the facet feature of Archicode comes into play.
Step #3: Define the authorization facet
Step 3 marks a pivotal moment where we delve into the facet definition for authorization, a progression that’s essential in honing the focus on specific architectural elements and relationships. The objective is to streamline the view, ensuring that authorization concerns are distinctly highlighted and easily interpretable.
The facet definition is embodied in the creation of the oidc facet within the workspace configuration. This facet, named oidc, filters out elements and relationships that aren’t tagged with the term oidc. The result is a refined view where authorization concerns are not just visible but are the focal point, enabling a deeper, uncluttered insight into these specific interactions.
The workspace.yaml file is enhanced with the definition of the oidc facet. This inclusion is a significant stride towards achieving a tailored view that zeroes in on the authorization aspects of the architecture.
workspace.yaml with the facet definitionapplication:
elements:
- kind: "person"
id: "User"
relationships:
- destination: "EcommercePlatform.UserInterface"
- kind: "solution"
id: "EcommercePlatform"
elements:
- kind: "system"
id: "UserInterface"
relationships:
- destination: "EcommercePlatform.ProductCatalog"
- destination: "EcommercePlatform.UserManagement.UserProfileService"
- destination: "EcommercePlatform.OrderProcessing"
- destination: "EcommercePlatform.ContentManagement"
- kind: "system"
id: "ProductCatalog"
relationships:
- destination: "EcommercePlatform.UserManagement.IdentityAndAccessManagement"
qualifiers: [ "oidc" ]
- kind: "system"
id: "UserManagement"
elements:
- kind: "container"
id: "IdentityAndAccessManagement"
relationships:
- destination: "EcommercePlatform.UserManagement.UserProfileService"
- destination: "SocialIdentityProvider"
- kind: "container"
id: "UserProfileService"
relationships:
- destination: "EcommercePlatform.UserManagement.UserProfileDatabase"
- destination: "EcommercePlatform.UserManagement.IdentityAndAccessManagement"
qualifiers: [ "oidc" ]
- kind: "container"
id: "UserProfileDatabase"
- kind: "system"
id: "OrderProcessing"
relationships:
- destination: "EcommercePlatform.ProductCatalog"
- destination: "PaymentGateway"
- destination: "EcommercePlatform.UserManagement.IdentityAndAccessManagement"
qualifiers: [ "oidc" ]
- kind: "system"
id: "ContentManagement"
relationships:
- destination: "EcommercePlatform.UserManagement.IdentityAndAccessManagement"
qualifiers: [ "oidc" ]
- kind: "system"
id: "SocialIdentityProvider"
- kind: "system"
id: "PaymentGateway"
settings:
facets:
customs:
- name: "oidc"
actions:
- operator: "REMOVE"
json-path: "$.application..relationships[?(@.qualifiers noneof ['oidc'])]"
- operator: "REMOVE"
json-path: "$.application..relationships[?(@.qualifiers == null)]"With the oidc facet defined, we re-run the command to generate the views. The outcome is a set of refined visuals where the focus is intensively on the odic qualified relationships and elements.
archicode views generate --view=EcommercePlatform-deepThe transformation is visualized in this updated PlantUML diagram. It presents a view where the clutter is minimized, and the spotlight is on the odic relationships, offering a clear perspective of the authorization dynamics within the ecommerce platform.
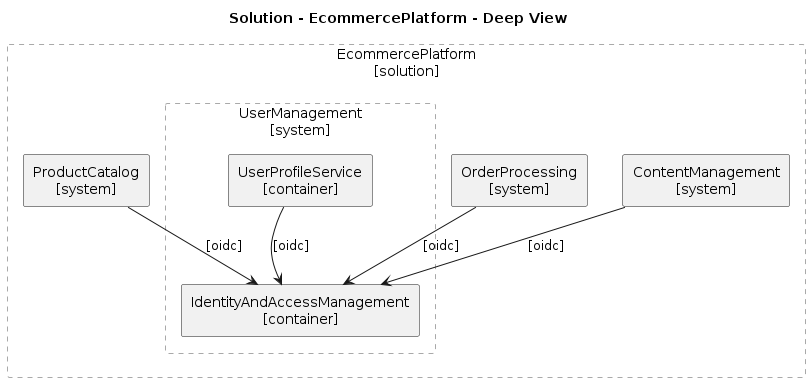
Concluding Step 3, we have successfully integrated the oidc facet, a move that transitions us from a broad, complex view to a refined, focused visualization of the authorization concern. It underscores the facet feature’s utility in Archicode, offering a tool that adeptly navigates the intricate terrains of complex architectural visualizations, ensuring clarity, focus, and comprehensibility.
Step #4: Define the main facet
In this step, we transition from the specific authorization focus, reintegrating into the broader view of the ecommerce platform. However, the approach is refined; we’re disabling the default facet and defining a new one named main to effectively manage the detailed views.
This newly defined main facet is crucial; it’s a tool that filters out all relationships tagged with the term oidc. The outcome is a holistic yet focused view of the ecommerce platform, excluding the specific authorization elements, for a balanced and comprehensive perspective.
The workspace.yaml is updated to include the definition of the main facet. This acts as a filter, excluding the oidc qualified relationships, thus providing a clearer view of the primary architecture without the specific authorization elements.
workspace.yaml with the facet definitionapplication:
elements:
- kind: "person"
id: "User"
relationships:
- destination: "EcommercePlatform.UserInterface"
- kind: "solution"
id: "EcommercePlatform"
elements:
- kind: "system"
id: "UserInterface"
relationships:
- destination: "EcommercePlatform.ProductCatalog"
- destination: "EcommercePlatform.UserManagement.UserProfileService"
- destination: "EcommercePlatform.OrderProcessing"
- destination: "EcommercePlatform.ContentManagement"
- kind: "system"
id: "ProductCatalog"
relationships:
- destination: "EcommercePlatform.UserManagement.IdentityAndAccessManagement"
qualifiers: [ "oidc" ]
- kind: "system"
id: "UserManagement"
elements:
- kind: "container"
id: "IdentityAndAccessManagement"
relationships:
- destination: "EcommercePlatform.UserManagement.UserProfileService"
- destination: "SocialIdentityProvider"
- kind: "container"
id: "UserProfileService"
relationships:
- destination: "EcommercePlatform.UserManagement.UserProfileDatabase"
- destination: "EcommercePlatform.UserManagement.IdentityAndAccessManagement"
qualifiers: [ "oidc" ]
- kind: "container"
id: "UserProfileDatabase"
- kind: "system"
id: "OrderProcessing"
relationships:
- destination: "EcommercePlatform.ProductCatalog"
- destination: "PaymentGateway"
- destination: "EcommercePlatform.UserManagement.IdentityAndAccessManagement"
qualifiers: [ "oidc" ]
- kind: "system"
id: "ContentManagement"
relationships:
- destination: "EcommercePlatform.UserManagement.IdentityAndAccessManagement"
qualifiers: [ "oidc" ]
- kind: "system"
id: "SocialIdentityProvider"
- kind: "system"
id: "PaymentGateway"
settings:
facets:
global-enabled: false
customs:
- name: "main"
actions:
- operator: "REMOVE"
json-path: "$.application..relationships[?(@.qualifiers anyof ['oidc'])]"
- name: "oidc"
actions:
- operator: "REMOVE"
json-path: "$.application..relationships[?(@.qualifiers noneof ['oidc'])]"
- operator: "REMOVE"
json-path: "$.application..relationships[?(@.qualifiers == null)]"A regeneration of the views is executed to reflect the integration of the main facet. This provides a fresh perspective where the specific authorization elements are filtered out, offering a cleaner, uncluttered view of the ecommerce platform’s primary architecture.
archicode views generate --view=EcommercePlatform-deepThis updated PlantUML diagram illustrates the ecommerce platform’s architecture with the main facet applied. It’s a visual representation that offers insights into the primary elements and relationships, free from the specific OIDC authorization elements.

By the closure of Step 4, we have not only successfully defined but also effectively applied the main facet. It reveals a balanced view, where the specific authorization elements are excluded, ensuring that the primary architectural elements and relationships of the ecommerce platform are the focal point. It’s a testament to the adaptability and precision that the facet feature introduces to Archicode, affirming its role in enhancing the visualization and management of complex architectural designs.
Conclusion
As we wrap up this insightful exploration, the potency and strategic advantage of utilizing facets in Archicode to streamline complex workspace views stand prominently unveiled. Each step of this guide, meticulously articulated, serves as a testament to the transformational impact of facets – a feature that elevates clarity, focus, and organization in the visualization of intricate architectural models.
From the initiation of the workspace, where the complexity and detailed nature of architectural expressions were laid bare, to the seamless integration of specific concerns like authorization, each phase underscored a resonating need – the need for a tool that grants architects and designers the liberty to dive deep without drowning in complexity. The facet feature in Archicode emerges as this indispensable tool, offering a lifeline that transforms intricate views into organized, manageable, and insightful visual narratives.
Through the practical application laid out in the steps, the prowess of facets in isolating and emphasizing specific concerns has been effectively illustrated. In the world of architectural design and modeling, where complexity is a constant companion, facets offer a bridge to clarity. They serve as a lens, focusing on distinct elements and relationships, making the comprehension of complex interactions not just possible but also intuitive.
The incorporation of facets in Archicode is not a mere enhancement; it is a pivotal evolution that underscores our commitment to empowering professionals to navigate the intricate landscapes of architectural design with confidence and precision. As we peer into the future, the continuous refinement and enhancement of this feature stand as a priority, promising users an ever-evolving tool that adapts and resonates with the dynamic nature of architectural design.
We are on the cusp of a new dawn, where the boundaries of understanding and visualizing complex architectural expressions are not just expanded but are also redefined. With facets at your disposal, every view is a canvas of clarity, every model an artwork of organized complexity. We extend an invitation to immerse into this enriched experience, to explore, understand, and innovate with a tool that transforms complexities into insightful visual narratives.
In the intricate dance of elements and relationships that define architectural models, facets emerge as the choreographer, orchestrating a performance where complexity and clarity coexist in harmonious synchrony. Welcome to a world where every detail is visible, every complexity manageable, and every view a journey into profound, yet organized insights. Your canvas of unlimited potential awaits, and we are excited to witness the masterpieces of clarity and innovation that you will create.
Source Code Organization
Efficiently organizing your source code is a cornerstone of successful architectural endeavors, and ArchiCode is your companion in this journey. Let’s delve into the best practices for structuring your source code using ArchiCode:
-
Workspace Dynamics: The workspace file, named
workspace.yamlby default, serves as a centralized repository for your architectural data. -
Scaling Challenges: As your architectural vision flourishes, the workspace file’s contents may expand, leading to management complexities. Recognizing the need for efficient management, ArchiCode introduces the concept of manifests. A manifest embodies a singular architectural resource, enabling focused and structured representation. With manifests, ArchiCode empowers you to break down complex elements into distinct resources, enhancing manageability and granularity. ArchiCode streamlines the process of manifest discovery by default. It effortlessly detects manifests residing in the "manifests" folder, positioned as a sibling to the workspace file.
- project_dir/ (1)
    - manifests/ (2)
        - application/ (3)
            - <FILENAME>.{yaml,toml,json} (4)
            - ....
        - technology/ (5)
            - <FILENAME>.{yaml,toml,json}
            - ....
    - views/ (6)
        - <RENDERER NAME>/ (7)
            - application/ (8)
                - <VIEW_ID>.<EXTENSION> (9)
                - ....
            - technoloy/
                - <VIEW_ID>.<EXTENSION>
                - ....
    - workspace.yaml (10)
-
The directory of the project.
-
The directory containing the manifests.
-
An arbitrary directory containing the manifest related to the Application layer.
-
A manifest file.
-
An arbitrary directory containing the manifest related to the Technology layer.
-
The directory containing the generated views.
-
By convention, Render renders their views in subdirectory matching the Render’s name.
-
By convention, Render renders views in directory layers.
-
By convention, the filename of rendered views is the view identifier. The extension depends on the Renderer.
-
The workspace file is mandatory even if empty.
-
Manifest Diversity: ArchiCode efficiently handles multiple manifest directories, facilitating the seamless incorporation of manifests, including those from package managers like NPM. This versatility enables architects to integrate diverse architectural elements from various sources. This integration showcases ArchiCode’s adaptability and its role in enhancing architectural endeavors.
- project_dir/ (1)
    - manifests/ (2)
    - node_modules/ (3)
        - <MODULE_NAME>/ (4)
    - workspace.yaml (5)
-
The directory of the project.
-
The directory containing the manifests defined in the project.
-
The directory containing the installed NPM modules.
-
The directory containing the NPM module importing the other manifests.
-
The
workspace.yamlmust declare both directoriesmanifestsandnode_modules/<MODULE_NAME>to be able to discover all manifests
Appendix
Data Structures
Base Element
All elements share the attributes of the Base Element.
| Name | Type | Comment |
|---|---|---|
id |
string |
The identifier of the element. Its format should match the variable name in Java or Javascript. |
name |
string |
The human name of the element. |
description |
string |
A short description of the element, usually between 25 and 75 words. |
qualifiers |
string |
A list of specific characteristics that helps define or categorize the element. They are usually rendered in views. It can be the name of the main framework used to implement a container: Spring Boot. Or it can be the name of the RDMS for a database Container : PostgreSQL. |
tags |
string |
A list of key/value pairs that helps to drive the rendering of views. For instance, to assign a predefined shape to the element or to categorize the element during a threat modeling process. |
relationships |
string |
The list relationships where the current element is the source. |
Application Layer
| Name | Type | Comment |
|---|---|---|
elements |
an array of Solution or System elements |
A list of embedded objects. |
Solution
The Solution Element inherits the attributes of the Base Element.
| Name | Type | Comment |
|---|---|---|
elements |
an array of System elements |
A list of embedded objects. |
System
The System Element inherits the attributes of the Base Element.
| Name | Type | Comment |
|---|---|---|
elements |
an array of Container elements |
A list of embedded objects. |
Container
The Container Element inherits the attributes of the Base Element.
| Name | Type | Comment |
|---|---|---|
elements |
an array of Component elements |
A list of embedded objects. |
Component
The Component Element inherits the attributes of the Base Element.
Technology Layer
| Name | Type | Comment |
|---|---|---|
elements |
an array of Environment elements |
A list of embedded objects. |
Environment
The Environment Element inherits the attributes of the Base Element.
| Name | Type | Comment |
|---|---|---|
elements |
an array of Node elements |
A list of embedded objects. |
Node
The Node Element inherits the attributes of the Base Element.
| Name | Type | Comment |
|---|---|---|
applications |
an array of references which refrence elements of the Application Layer |
The list of reference elements. |
elements |
an array of Node elements |
A list of embedded objects. |
Relationship
| Name | Type | Comment |
|---|---|---|
destination |
string |
The reference of the destination element within the same layer. |
label |
string |
A human-readable text defining the relationship. |
qualifiers |
a list of strings |
A list of specific characteristics that helps define or categorize the relationship. They are usually rendered in views. It can be the name of the protocol implementing the link. |
tags |
a list of ky/value pairs |
A list of key/value pairs that helps to drive the rendering of views. For instance, to set TCP ports and IPs driving the rendering of Kubernetes Network Policy manifests. |
View
| Name | Type | Comment |
|---|---|---|
id |
string |
The identifier of the view. Its format should match the variable name in Java or Javascript. |
viewpoint |
string |
The code of the viewpoint identifying the viewpoint service. |
layer |
string |
The reference data model of the viewpoint: |
name |
string |
The human name of the element. |
description |
string |
A short description of the element, usually between 25 and 75 words. |
properties |
any |
A custom object containing properties to drive the execution of the viewpoint and/or renderer service. |